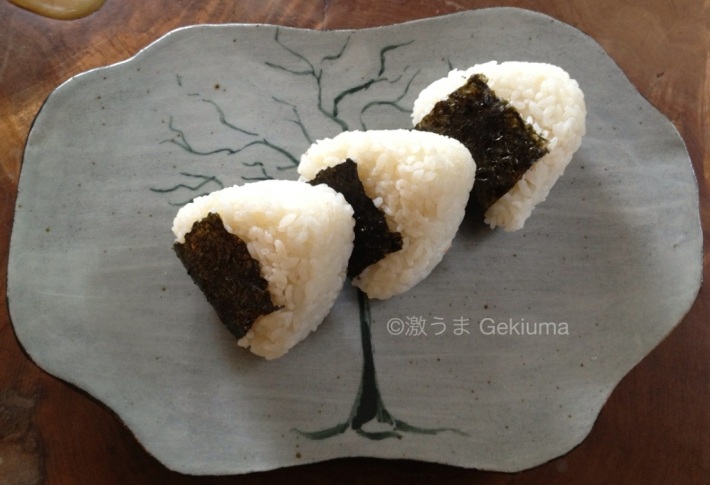
I find that the times I’m by myself I eat very simply. Part of it is that I’m a social eater and when the hubby’s off conferencing and schmoozing I only eat when I’m hungry and tend to crave flavorful foods without much fuss and that’s お握り onigiri (also called お結び omusubi or 握り飯 nigirimeshi) in a nutshell. When I was younger I used to see my favorite anime characters happily chowing down on triangular-shaped rice with a black strip of nori and always wondered what could make something so simple look like it was the best tasting thing this side of ポッキー pōkki (another irresistible Japanese chocolate dipped biscuit stick snack). Part of the appeal of onigiri is the perfect hand-sized shape coupled with varying textures: moist tender short grain rice, a crispy-chewy 海苔 nori wrapper, and a soft savory filling running the gamut from 梅干し umeboshi (pickled plum) to ツナマヨネーズ tsunamayonēzu (the strangely popular canned tuna with mayonnaise) to even 鳥の空揚げ tori no karaage (fried chicken, that izakaya favorite). These versatile rice balls are perfect as little meals or on the go snacks. So since the fishmonger is still getting amazing buttery Chinook salmon from British Columbia, 塩鮭 shiozake (salted salmon) it is! Usually shiozake is made by literally salting salmon but I prefer the nutty saltiness of miso so I make mine with 白味噌 shiromiso (white miso) and salting them overnight in the refrigerator allows them to absorb the miso flavor as well as dehydrating the salmon just a little which is good cuz you don’t want a mushy rice ball. You can also evenly mix the shiozake or whatever filling you decide to go with throughout your rice making sort of an inside-out onigiri. People have also been known to mix in some 振り掛け furikake (dried seasoning mix in different flavors like salmon, green tea, or even kimchi, usually with bits of nori and sesame seeds in it) as well. Sometimes I like to add toasted white sesame seed on the outside to give it a nutty flavor and a little extra texture. Onigiri are pretty flexible and free flowing so you’ll probably find yourself experimenting to fulfill all your mad scientist cravings 🙂
Shiozake (Salted Salmon)
4 oz salmon fillet, pin bones removed
1 tbsp shiromiso (white miso)
2 tsp canola oil
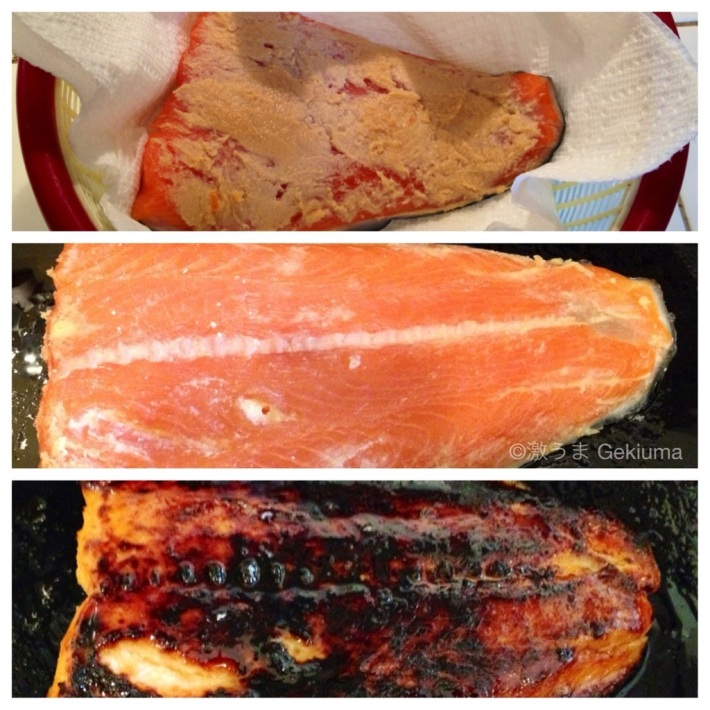
Evenly coat salmon flesh with miso in a ~1/4-inch thick layer. Place a couple paper towels in a colander and then lay salmon on towels. Refrigerate overnight ~8-12 hours. You can also salt the salmon for up to 24 hours if you like your salmon saltier but not longer as the salt can start to cure the salmon making it tough.
Oil a small baking pan with the canola oil. Use a paper towel to gently wipe off miso paste, it’ll look smeary like in the middle photo above but that’s fine. **If you only want to make a few onigiri, cut the fillet into1-2 inch widths along the short axis and freeze the otherpieces in individual bags to be thawed and cooked fresh the next time you want a snack 🙂 Place salmon in pan skin side down and broil on second highest oven rack for ~7-8 minutes. When a sharp knife inserted into the flesh goes through easily without resistance it’s at medium doneness. You can either leave the skin on or remove it (the pooch lurrves salmon skin so I take mine off, cook it a little more and crumble it in his kibble as a treat).
Shiozake (Salted Salmon) Onigiri
3 c fresh steamed sushi rice
1/2 – 1 oz shiozake
Sea salt
2 tsp toasted white sesame seeds, optional
1 sheet 海苔 (nori–toasted seaweed)
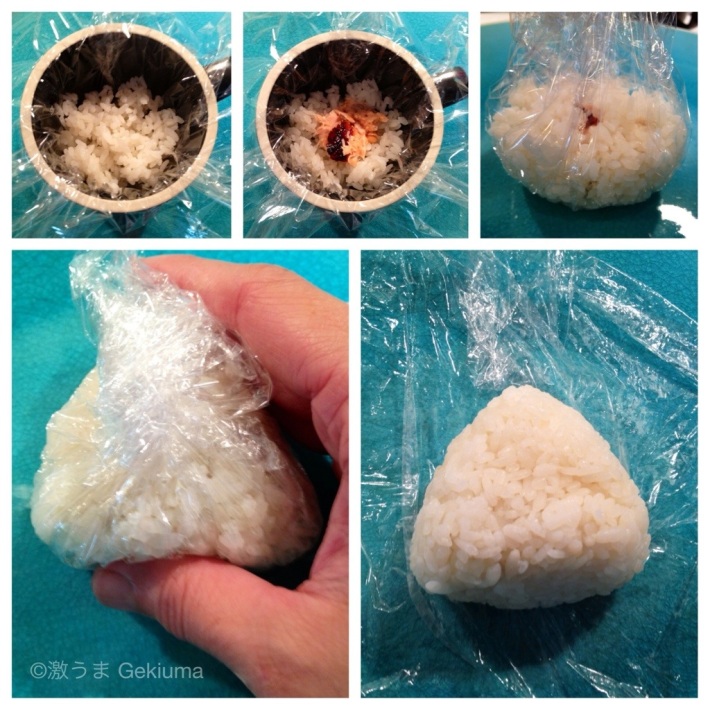
If you don’t have a handy little onigiri mold you can still make these tasty rice balls with a really ingenious technique I learned from the brilliant Just Hungry Japanese food blog. If you want to learn about how to make classic Japanese foods as well as sneak in a dose of culture and history you’ll love reading it as much as I do 🙂 Besides giving you neat little onigiri using the plastic wrap also keeps you from burning your tender little paws while handling hot rice straight out of the rice cooker. In a small tea cup, place a piece of plastic wrap large enough to overhang the edges by a few inches. Sprinkle a small pinch of salt into the plastic wrap. Place ~1/2 c of hot steamed rice (freshly made straight out of the rice cooker so it will be moist and hot enough to stick together easily) into the cup. Add ~1 tbsp shiozake over the middle of the rice. Cover with another ~1/2 c steamed rice and top with another small pinch of salt. Pick up the rice “ball” by pulling up the plastic wrap so that it makes a small pouch. Twist the pouch so that the rice is tightly encased in the bottom. While holding the top of the twisted plastic wrap closed, press the pouch down so that the bottom edge of the rice becomes flat. While the bottom is on your flat surface, make a triangle with both hands (the rice pouch will be in the middle of the triangle) and press in on the rice pouch from both the left and right sides. Press firmly but don’t smash and you will get flat sides for your triangle. While holding your triangle sides with your fingers, firmly pat down the top of the pouch to create a flat top edge. Open up the plastic wrap. Wet your hands with some water and sprinkle salt over your hands. Pick up the onigiri and firmly press all the flat sides to salt them a little more and make sure that they’re firmly packed. Sprinkle some sesame seeds on your hands and pat onto onigiri sides if using. Lather, rinse and repeat with remaining rice to make the other two onigiri 🙂
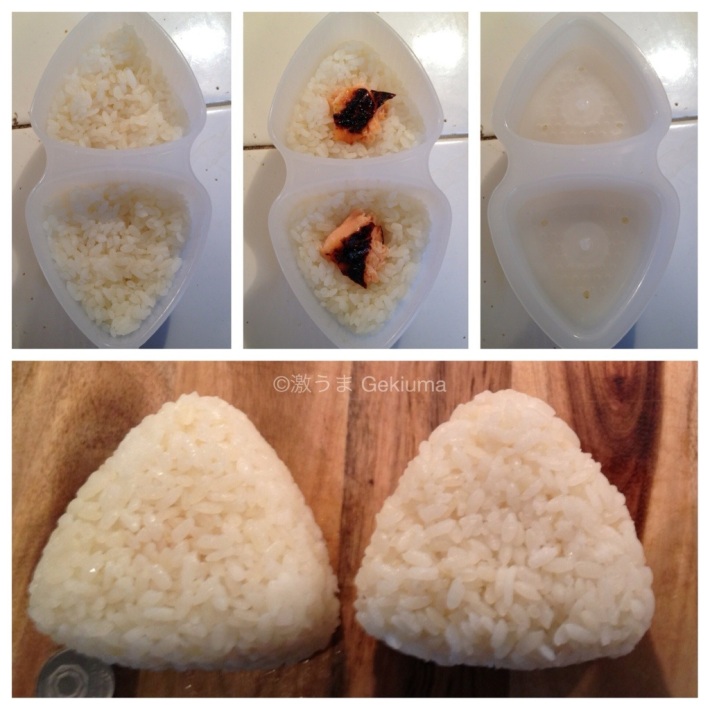
If you’re lucky enough to have onigiri molds, this is even easier although the more you make onigiri, the faster the pouch method becomes. With the molds, I like to dunk them in a large mixing bowl of water so that the rice sticks together instead of to the mold. Pull them out, don’t dry them, and sprinkle them with salt. Firmly packing down the rice, fill the mold half-way. Press down on the rice with the mold lid to make sure its firmly packed. Although the mold does have little indentations on the lid to make holes for your fillings, I’ve found them to be too shallow. Use your index finger to make a ~1/2-inch hole in the center of the rice then add ~1 tbsp of shiozake to the hole. Cover with rice, firmly packing to fill the mold. Pop the onigiri out of the mold by pushing from the back side. Repeat the steps above with wetting and salting your hands to salt and firmly pack the onigiri.
Cut or fold and tear nori into three 4 x 2-inch strips. Press onto onigiri, if they’re not sticking you can wet them a little on the edges. I like to add the nori just before I’m ready to eat so that it retains its crispiness as it will steam from the heat and moisture of the rice and get chewy if you leave it on for long. Makes 3 onigiri, the perfect size for a small lunch or individual snacks 🙂
**Estimated nutritional info: 1 onigiri contains approximately 235 calories, 219 mg omega-3 fatty acids (w00t!), 1 g fat, 44.5 g carbohydrates, and 7.6 g protein.


Those onigiri look perfectly adorable — but it is the salmon I am drooling over. It looks seriously amazing! If I had made that, I would probably have picked at it until there was none left for the rice balls! =)
Haha, I must admit it’s very satisfying to just sprinkle some over a bowl of rice and just start chowing down! The fishmonger on Hawthorne really has some amazing salmon right (most of the year) now.
That salmon really has me considering trying to make these, Cam. I like the saltiness of it. As you may have guessed, I’ve no onigiri mold but the Just Hungry sites instructions weren’t at all that difficult to follow. I just might give this a try. I should probably make sure I’ve got some sake on hand. You know, for courage. 🙂
Thanks for sharing.
The sake will totally make your onigiri experience delicious lol. The funny thing is it takes me ten times the amount of time to write a recipe as it does to cook it. Sometimes I’m thinking, “How can this be so easy to do yet trying to put it in words makes it seem like reading stereo instructions in Dutch?”
Very good blog! I truly love how it is simple to read.
I’m wondering how I could be notified when a new article has been made. I have subscribed to your feed which should do! Have a great day and please excuse my poor english!
Thanks! Actually, your English is very good. If you want to receive a copy of each new post, you can sign up to have it emailed directly to you (you will only receive emails of my new posts, no other emails or spam and can easily unsubscribe whenever you want to) by filling your email address into the “Follow Blog via Email” box and the magical robots at WordPress will send it to you 🙂
these are sooo adorable! and that salmon looks delicious! what meal course would this be considered? a snack? an appetizer? they look DELICIOUS!
Thanks! If you eat 2-3 these could easily be a meal, they’re often used in bento/lunch boxes and are the Japanese equivalent of sandwiches with a rainbow of different filling options, or you could just eat 1 as an appetizer or snack. I think that’s why I like them so much, they’re so versatile and fit perfectly in my hands 🙂